Showing posts with label First Birthday Party. Show all posts

Saturday, August 30, 2014

The Very Hungry Caterpillar 1st Birthday Party


I did a super fun Very Hungry Catterpillar Party for my daughter's 1st Birthday! I loved everything about it, it was so much fun for me (and hopefully for her too!) My last few posts are how-to's for different things from the party. This post will be shorter, just refer to the other posts for more information.

Here are the tables. I loved them and all the centerpieces have cute photos of my birthday girl eating whatever the Hungry Caterpillar ate. Check out this post for how I made the centerpieces:
 http://berriesofwisdom.blogspot.com/2014/06/the-very-hungry-caterpillar-party.html


 I also had these candy caterpillars on the tables too. They are similar to the candy lei's you would make for a graduation or something too, but in a caterpillar shape instead of a necklace. Check out this post for how-to make the candy lei:
http://berriesofwisdom.blogspot.com/2014/07/the-very-hungry-caterpillar-party.html


This was my condiment, napkin, and paper plates table. I also had this cute paper plate caterpillar decoration here, but you can put him anywhere or use him as a fun centerpiece too. I also had a fill-a-bowl full of all the fruit the caterpillar eats and  some of my food and plasticware on this table too. Here is a link for how-to make the paper plate caterpillar :
http://berriesofwisdom.blogspot.com/2014/07/the-very-hungry-caterpillar-party.html


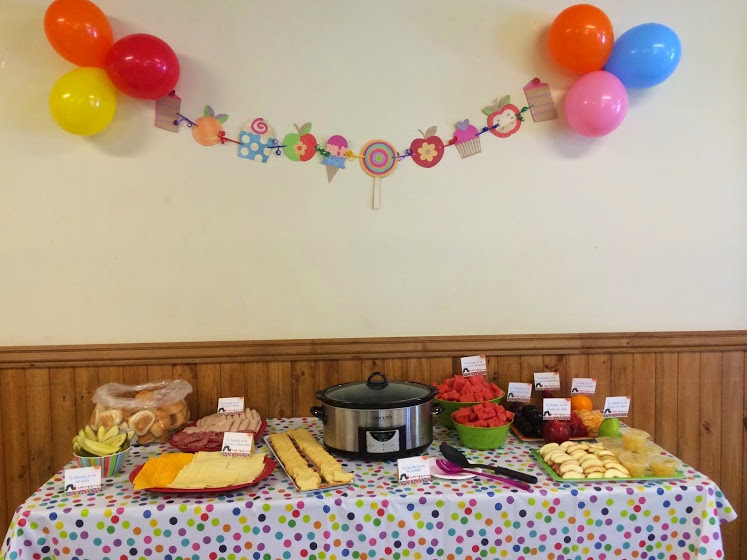
My food table! This was the most fun part because I did all the food that the caterpillar eats in the book. Check out a break-down of all my cute food here http://berriesofwisdom.blogspot.com/2014/08/the-very-hungry-caterpillar-party-food.html


 My how-to for the lollipop holder box is here:


I made all my banners myself with the Cricut paper cutter, and for the most part I just used the cartridges that came with it. Follow this link for simple instructions for all my banners:


I loved this big caterpillar floormat under the highchair!


 "One Sunday morning the sun came up, and POP out of the egg came a tiny, very hungry caterpillar"
 
 
 I used this giant sun balloon to represent the sun that is in the Eric Carle books, specifically at the beginning of The Very Hungry Caterpillar. And I used a butterfly piƱata to represent the butterfly that the caterpillar turns into. I also had butterfly nets for the kids to play with too.


I also had a 'craft' table for the kids too. It was full of The Very Hungry Caterpillar printable pages to color, boxes of crayon,  Very Hungry Caterpillar stickers, erasers, pencils, etc. (I found 7-piece pencil bag and stationary kits form the dollar section at Target). I found the free printable from http://thesweetersideofmommyhood.wordpress.com/2012/10/03/wordy-wednesday-the-very-hungry-caterpillar/


I also had plenty of sidewalk chalk and bubbles for the kids to play with.


My cakes are from sprinlebellecakes.com


Tuesday, August 5, 2014

The Very Hungry Caterpillar Party Decorations-Part III


My hubby gave me a smaller budget than I'm used to for my daughter's 1st birthday party, so I was 'forced' to make all my own decorations. Normally I would buy all sorts of cute banners and decor from someone on Etsy for WAY to much money (but very convenient), but I recently got a Cricut paper cutter and I have stacks of random scrapbook paper so I thought I could try to make everything myself. My  theme was The Very Hungry Caterpillar, which I felt would be easy because I could just cut out a bunch of circles. And it was super easy.

I made quite a few banners, and all but one of them were made using just the basic Cricut Cartridge that comes the Cricut paper cutter, so I didn't even have to buy any special cartridges for the banners.

The first banner I made was a Happy Birthday Banner.


The Happy Birthday Banner was just 3 separate banner; 1st banner read "Happy", 2nd banner read "Birthday", and the 3rd one had my daughter's name. I made sure to position the caterpillar head facing opposite directions on alternating banners.
 
Then I made a I am 1 Banner (this was for my little one's first birthday!)


 I originally planned to put this banner around the tabletop of the highchair, but then you couldn't read it all so we placed it on the wall behind the highchair. The banner looked cute underneath my Caterpillar Balloon guy too.
 
 
I also made a Very Hungry Caterpillar "Floormat" that I placed under the highchair
 
This cute guy was under the highchair to help catch some of the falling smash cake.
 
 
My favorite thing was the Year of Pictures Banner of my daughter:


(Left hand corner in the below pic, on the wall)
 
I placed a picture of my daughter, one for each month of her life so far (and then a couple extra irresistible photos too). And of course the caterpillar head at the beginning. 
 
And I made a FUN FOOD BANNER with all different food cut-outs (all items of food the caterpillar eats in the book). I made this banner using a couple other cartridges (Preserves Cartridge and Sweet Treats cartridge) and I used a lot of things I had already cut out for my centerpieces, but they had a mistake or couldn't be used for some reason. (Check out my Very Hungry Caterpillar Centerpieces here: http://berriesofwisdom.blogspot.com/2014/06/the-very-hungry-caterpillar-party.html )


For a majority of the banners, I just cut out a lot of circles. The circles for my Year of Photos Banner were a little larger (I think I cut the outer circle 7 inches), but all the rest were cut to 5 1/2 inch circles, mainly so that I could cut 4 circles out of each 12x12 sheet of scrapbook paper and not waste too much excess paper. The inner circle was cut a little bit smaller, and the red circles for the head were cut the same size as the outer circles. And for the Year of Photos Banner, I printed 4x6 photo prints, And I cut them into 4 inch circles to place in the center of each circle.


Then I made the cute faces. I cut out 3 inch ovals (yellow), for the outer eyes. Then slightly smaller ovals (green) for the center of the eye and for the noses. For the antenna, I just cut them out with good old scissors since I didn't need too many and I didn't have a Cricut cartridge for the shape I wanted. I stuck butterfly stickers (from an Eric Carle set of stickers) for the spacing on the "I AM 1" banner and on the tail circles of the Happy Birthday banners. I pieced the circles together with present wrapping ribbon from the dollar store (except the Year of Photos Banner, I just taped each individual part on the wall).
 
I made sure to cut out a face for the Balloon Caterpillar
and a face for my paper plate caterpillar too while I was at it.
Directions for this paper plate caterpillar are here:
He was super easy and very inexpensive too!
 
 
I cut out 11 1/2 inch circles for the caterpillar floormat, glued them together to fit through the legs of the highchair, and made another cute face and antenna.
 
 
I also used the same stickers and squares of colored scrapbook paper and toothpicks to make these cupcake toppers.